How to Upload Image in Pdf Forms
Populating PDF Forms With Images and Text
- Introduction
- This tutorial shows how to populate a PDF form with text and images from an Excel spreadsheet. We are going to prove how to create a PDF form for filling information technology with images and text, prepare a information file and execute a mail merge to produce multiple customized PDF documents.
- Annotation: This tutorial is for AutoMailMerge™ plug-in for the Adobe® Acrobat®.
-
- Overview
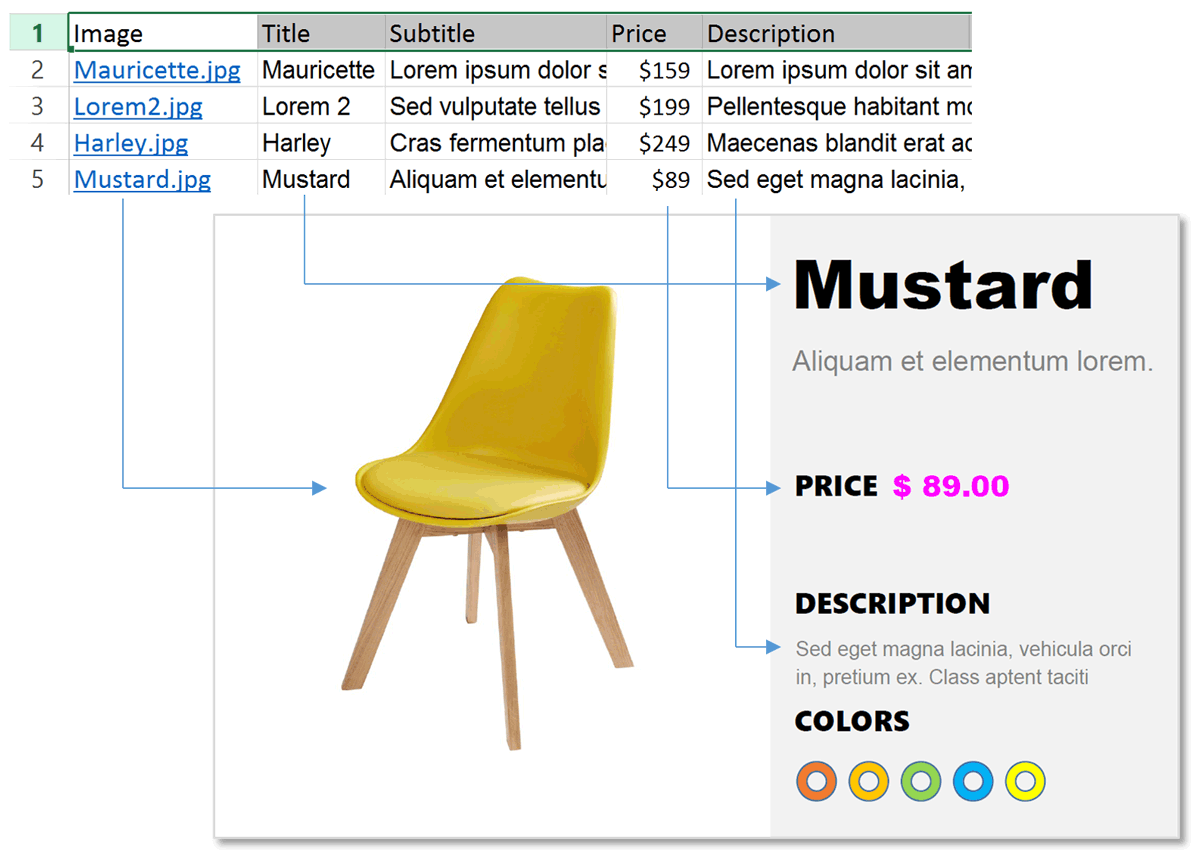
- Nosotros are going to create "product information cards" in PDF format for 12 models of chairs. Each product menu will be filled with text and images from an Excel spreadsheet. The image placement is done past using PDF buttons (or Image Fields). Image files will exist used to populate button (image) fields by using Excel hyperlinks. The AutoMailMerge™ automatically assumes the image-filling mode for all push button (prototype) fields. Whatsoever text used to populate a push field is assumed to represent a file reference (absolute or relative).
- The general workflow is comprised of 3 steps:
-
- Create a PDF Grade
- Prepare a Data File
- Run Mail Merge Procedure
- Input Document Description
- The tutorial is using an Excel spreadsheet as a mail merge information source. The spreadsheet contains product information for 12 different models of chairs. There are 5 data fields (columns) in the spreadsheet: "Prototype", "Title", "Subtitle", "Toll" and "Clarification". The data from each row needs to be placed on the PDF course to create individual PDF "product cards".
- Prerequisites
- You lot need a copy of the Adobe® Acrobat® along with the AutoMailMerge™ plug-in installed on your figurer in club to use this tutorial. You can download trial versions of both the Adobe® Acrobat® and the AutoMailMerge™.
- Stage 1 - Create a PDF Course
- The easiest fashion to place images into a PDF form field is via buttons. PDF push button tin can have an "icon" associated with it and therefore can be used as a placeholder for images. The image for the button can be imported from common image files (BMP, GIF, JPEG, PCX, PNG, TIFF) and PDF files.
- Step 1 - Open a PDF Form Editor
- Beginning the Adobe® Acrobat® application. Select "Tools" from the main toolbar. Select the "Prepare Grade" tool to open up a course editor.
-
.PNG)
- Footstep 2 - Select a Template PDF File
- Select an existing PDF file that will be as used every bit template for the PDF form.
- It is common to design documents in the text editor such every bit Microsoft Give-and-take, Adobe InDesign, or in any other similar application and then export information technology into PDF format. The form editor is used only to add fillable forms fields to allow using the document in the mail merge procedure.
-
.PNG)
- Footstep 3 - Add together an Image Field (Button)
- The "Image" field needs to be placed on the grade at the location where an image needs to be positioned. Once a PDF file is opened in a form editor, click the "Add an Epitome Field" icon.
-
.PNG)
- If your version of Adobe Acrobat does not accept an "Epitome Field" icon on the toolbar, then add a "Button" field by selecting a corresponding icon from the toolbar:
-
.PNG)
- Motility cursor to a folio location where you want to place an image field. Yous should see a blueish rectangle that represents a field. Printing and hold left mouse push button and drag a rectangle where you lot want to place a text field. You volition be able to change field position and size at whatever time.
-
.PNG)
- Type a proper name of the field into a "Field Name" box. Field names are used to uniquely identify each field on a PDF grade. We are going to name this field "Image". It is a good thought to use the aforementioned name for both form and data fields to simplify the field mapping. Information technology is not a requirement, merely saves time and make the process more than transparent. Click "All Properties" to specify image (push button) properties.
-
.PNG)
- Field's proper name and backdrop tin be changed at any time by right-clicking on the button (epitome) field and selecting "Backdrop..." from the pop-upward bill of fare.
-
.PNG)
- Step 4 - Prepare Appearance
- Optionally, specify common properties in the "General" tab. Next, select the "Appearance" tab.
-
.PNG)
- Choose border and background color ("Fill color"->"No Fill up" works the best for most applications). Next, select the "Options" tab.
-
.PNG)
- Make sure that "Layout" is set to "Icon only". This should enable the "Choose icon" push button. Click "Choose Icon..." to select a sample image to assist with proper sizing the button. The prototype selected at this stage will exist overwritten during the postal service merge process. It is used as a sample only.
-
.PNG)
- Click "Browse...".
-
.PNG)
- Select a sample image and click "Open".
-
.PNG)
- Click "OK" in the "Select Image" dialog.
-
.PNG)
- Click "Close" to save.
-
.PNG)
- Size the button accordingly by pulling on blue "handles" at the sides of the button.
-
.PNG)
- The newly added field volition appear in the "FIELDS" list.
-
.PNG)
- Pace 5 - Add together Text Fields
- Add 1 or more text fields at all folio locations where variable text needs to be placed. Make sure to size each field large enough to accommodate the longest text cord expected. Click the "Add a Text field" icon and place the text field onto the form. See "How to Edit PDF Forms" for more details on text field editing.
- We take placed four text fields on the PDF form ("Championship", "Subtitle", "Price" and "Description"):
-
.PNG)
- Step 6 - Salve the PDF Grade
- Click "File > Salve" to save changes to the file. Now a previously static PDF document became an interactive PDF form.
-
.PNG)
- Stage 2 - Preparing Data
- We are going to use an Excel spreadsheet to store the data for the mail service merge. The cell hyperlinks will exist used to refer to image files. Note that Excel separates hyperlink URL from the jail cell display text. It is possible to type any text into a cell, regardless where the hyperlink is pointing to. The AutoMailMerge™ always use the hyperlink URL over the cell value. Alternatively, use a apparently text CSV file as a information source.
- Step 7 - Preparing Data in Microsoft Excel
- It is recommended to use the same column/field titles in both Excel spreadsheet and PDF course to simplify mapping between form and data fields.
-
.PNG)
- Create Hyperlinks To The Images
- Place all images into the same folder with the spreadsheet (optional, but recommended).
-
.PNG)
- Right click on a spreadsheet cell. Select "Link > Insert Link" from the pop-up menu.
-
.PNG)
- Select a file to hyperlink to in the "Insert Hyperlink" dialog. Click "OK".
-
.PNG)
- This will add together a hyperlink to the spreadsheet prison cell:
-
.PNG)
- Repeat the higher up steps for each jail cell that needs to refer to an image file. Salvage the file once the editing is completed.
-
.PNG)
- Stage 3 - Mail Merge Procedure
- Step 8 - Open up PDF Form
- Start the Adobe® Acrobat® application and using "File > Open up..." menu open up a PDF form template that was prepared at first footstep.
-
.PNG)
- Pace 9 - Open The "Mail Merge" Dialog
- Select "Plug-Ins > Mail Merge..." to open up the "Mail service Merge" dialog.
-
.PNG)
- Stride x - Edit Mail Merge Settings
- Press the "Edit Settings..." button to configure the mail merge parameters.
-
.PNG)
- Pace 11 - Select a Data Source
- Press the "Browse..." push button in the "Information Source" screen to select an input data file.
-
.PNG)
- Select "Microsoft Excel Worksheet (*xls.*xlsx)" from the list:
-
.PNG)
- Select prepared information source file (use a file prepared at the pace vii). Click "Open".
-
.PNG)
- Select a sheet from the list. Click "OK".
-
.PNG)
- Step 12 - Map Grade to Information Fields
- Click "Guess Mapping" in the "Data Source" screen. The software will automatically select field correspondence based on field names.
-
.PNG)
- The confirmation dialog volition appear on the screen. Click "Yes" to go along.
-
.PNG)
- The dialog showing the number of field mappings will be displayed. Click "OK".
-
.PNG)
- Step 13 - Examine the Field Mappings
- Examine the field mappings that have been guessed and click "Side by side >" to advance to the adjacent screen.
-
.PNG)
- Step fourteen - Specify Field Options
- Optionally, apply the "Specify Field Options" screen to control if output form fields should remain editable or not. Click "Next >" to advance to the next screen.
-
.PNG)
- Stride 15 - Specify Output Options Utilize "Select Output Options" screen to control where and how to save output PDF documents. Click "Browse..." to specify output folder. Optionally, specify output and file naming options. Cheque "Output a compound document that volition contain all filled forms" option if it is necessary to put all output files into a single PDF. Click "Next >" to proceed.
-
.PNG)
- Skip the rest of the screens by clicking "Next>" button multiple times, click "Cease" on the last screen.
-
.PNG)
- Step xvi - Save Settings
- Optionally, salvage mail merge settings into the *.mms file for later reuse past pressing the "Save Settings" push. Use the "Load Settings" button to load them back at a later time. Click "OK" to advance to the postal service merge process.
-
.PNG)
- Footstep 17 - Showtime Processing
- Printing the "Run Post Merge" button in the "Ostend Processing" dialog to beginning a mail merge process.
-
.PNG)
- The "Mail Merge Results" dialog will appear in one case a mail service merge is completed. Click "OK" to close this dialog and open an output binder.
-
.PNG)
- Step 18 - Examine Output Files
- Examine output files by opening them in the Adobe Acrobat. In that location are 12 individual PDF files created in this tutorials:
-
.PNG)
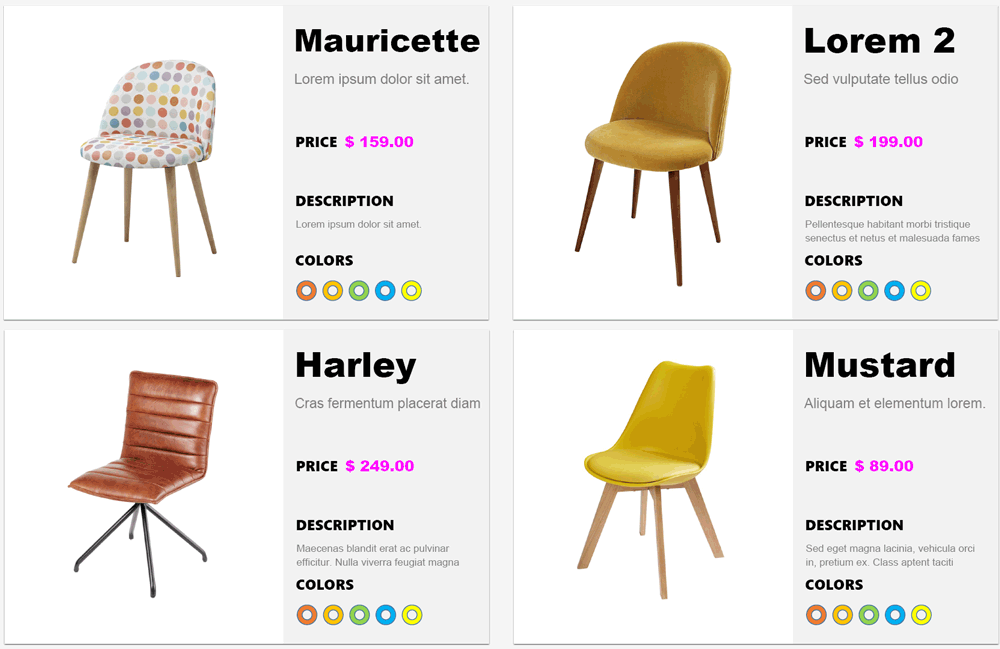
- Hither are the examples of the output PDF product cards generated by the mail service merge:
-
- Alternative Data Source: Using a Text File
- If using Excel is not viable for some reason, the most simple approach is to utilize a CSV (comma-separated values) text file format. All what is needed is a plainly text editor such as Notepad. The following example is shows a text data file with relative paths to the epitome files. For case, if the epitome files are located in the aforementioned binder as the data source file, then simply use the filenames and omit the total path to the files:
-
.PNG)
- The CSV information file can exist created using Notepad (although, information technology can exported from Excel or whatever other spreadsheet application). Open Notepad and type data while separating text in dissimilar fields by using commas. Select "File > Salve As..." to save the file.
-
.PNG)
- Select "All Files" from the "Salvage as blazon:" carte. Type a file proper noun adding ".csv" later file name. Click "Relieve"..
-
.PNG)
- Go back to Excel instructions
- You lot can find a list of other footstep-past-step tutorials here: https://www.evermap.com/tutorialsList.asp.
lilienthallogetch39.blogspot.com
Source: https://evermap.com/Tutorial_AMM_UsingImages.asp
0 Response to "How to Upload Image in Pdf Forms"
Post a Comment