That Level Again 4 Cheat Guide
 Legend of Grimrock Walkthrough:
Level iv
This is i of the most segmented levels in the game, each posing it'southward own type of challenge. (Note: The Slime Dungeon is covered in Level iii.)
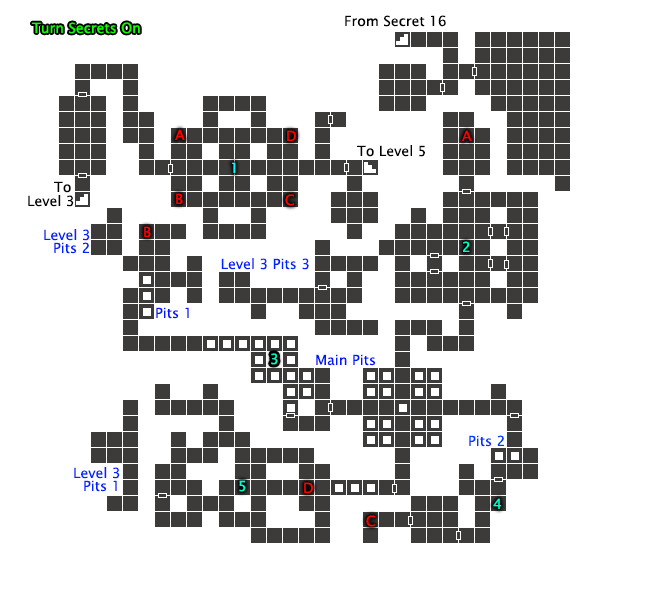
one. Main Hall
The gate will slam behind you and ii Adult Herders will welcome you to the 4th floor. Don't await to be able to attack these as yous have with the normal or small-scale herders and survive. Strafing attacking or ranged attacks are key every bit they spew poisonous gas, which will damage the entire party every second while they nonetheless attack you. Fighting one is easy enough, but because at that place is 2, be aware of your environs and then you don't end upward getting cornered. One of them has the Iron Key you need to continue.
Be sure to catch what you need as yous proceed into the Main Hall. Skeleton Archers will provide a welcoming deadfall hither, so don't get caught unaware. This Hall is the main area for the rest of the level as everything starts and ends here. There are four portals in the corners to the different area, all labeled and so you lot know where you are going. The far east side has the Iron Door and the manner to Level v, but both means are blocked for now.
To start the take a chance, enter the Beast Gardens and Menagerie.
Items Found: Flask, Grim Cap, Iron Key, Recipe for Energy Potions

two. Beast Gardens
As yous enter this surface area, yous will find a push button on the southeast corner and an energy receptacle on the southwest corner. To open the gate, press the button, the speedily strafe over to cake the receptacle. On the other side will be an endless supply of skeleton warriors waiting for y'all. This is an first-class surface area for unlimited experience. There aren't many places in the game that will requite you an opportunity like this, so I would highly recommend y'all to take advantage of information technology.
While your hunting skeletons, lets bank check out a underground. There are 3 cells hither, each with a button nigh them to open the gates, but they will slam close once you lot enter them. Don't worry, there is buttons in them to open the gates once more. If you enter the southeast cell, there is a button to open a secret in the northwest expanse of this room.
The play a trick on to open the door to the south is to lure the skeletons into the cells. Get one of their attention and dorsum up into one of the cells, quickly open up it again, then back out and the fool should follow y'all in. Do that all three times and the way forward will exist open up. This will too stop the endless spawning, and then be certain you lot're done farming before doing this (although releasing one volition outset the spawning once again).
A Crowern will probably wing out of the door when you lot get it open up, which will be the first of four. This is the main pit hall. Don't carp jumping into it yet, as there are better, and more than fruitful ways in. Just take hold of the coil near the middle and step on the teleporter to return to the Primary Hall. Side by side we get to Fourth dimension and Tide.
Items Found: Blooddrop Blossom (iii), Leather Boots, Pitroot Breadstuff, Quest Scroll, Ring Gauntlets
3. Time and Tide
This level starts off easy, only getting annoying later. Just to the west of the floor switch is some throwing knives and the pit has some food. When you step on that switch a timer will start clicking, then a teleporter will flash upward for less than a second. The goal is to shoot or throw a projectile into that teleporter to get it to the switch on the other side. It must be a projectile as whatever other item will just driblet when they teleport. This will trigger a switch to the southeast and close some of the pits then you can cross.
Don't rush on alee nonetheless. Make certain you are off that switch, then place something on it. This requires a fleck of precise timing, then you may want salvage offset. Just as the teleporter appears, step into it to get access to the Book of Infinite Wisdom. Once grabbed you can exit out and go along down the s path.
Now for the annoying part. Chances are, you will fall once, especially if yous desire to go the cloak-and-dagger, then I will explain the pit first. This pit is continued to the primary pit, and has a cage in the centre we can't access nevertheless. There are Skeleton Warriors and Archers here, likewise as some alchemy ingredients and nutrient. The fashion support volition take y'all dorsum to the Main Hall over again.
.
Items Found in Pit: Tar Bead, Cave Nettle, Couch Rat Shank, Baked Maggot
The puzzle is simple but it tin can be difficult. When y'all first footstep on the floor switch, the pits volition close one at a time, simply merely for a few seconds. In that location are also 2 paths, the normal path that goes direct eastward then due south, and the hush-hush. The secret is activated by a button on south wall above the 2d pit, which opens a passage south just a few more than squares to the eastward. I would recommend strafing to left across the pits to safely printing the button and enter the clandestine surface area.
Both paths will lead you lot to a open area where you need to shoot or toss something across to open the gate. There are as well a few Crowern that fly around this surface area, and fighting them will likely hateful that you autumn into the pit, which is the really annoying part. Once you do finally get past this obstacle, you lot tin can grab the item you lot tossed as well as some other Shuriken. You lot will exist back into the master pit hall again, then just take hold of the ringlet here and take the teleporter over again. Next is the Trails of Thought.
Items Constitute in Expanse: Baked Maggot, Book of Infinite Wisdom, Chitin Mask, Quest Curl, Shuriken, Throwing Knives (iii)
iv. Trails of Thought
This area is all about trial and error. Two challenges that will require you lot to memorize the patterns. If you tin can't figure it out, we accept a solution to them both.
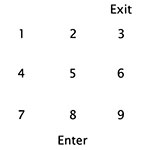
The first one is a maze of floor switches. There are ix switches in a 3x3 filigree on the floor, and each one will spawn or remove teleporters. The solution is a boundless path, so I'll explain it the best fashion I tin can.
Use the paradigm to the right every bit a guide, or signal at it with your mouse for it to animate. The path is eight, v, 2, 3, 6, v, 8, 9, half-dozen, 5, 8, vii (press the button), 4, 5, viii, vii, 4, five, viii, 9, half dozen, 5, 2, 3 (exit).
The next area is another pit trap. If you lot autumn in, there are 2 Slime Bells, and a small escape button on the wall where you fell into, but you will need to start this area over again so it isn't really worth it.
Get-go, get the secret. Just east of the archway to this room there is a button on the wall, which will open a hugger-mugger to the south w with a express use enchanted Dagger. Unlike arrows and Quarrels, you can't re-enchant it, then once information technology is used upwards, information technology is as useful as a regular dagger.
Back in the room with the pits, the solution is actually quite simple. From the door (not the switch), get forrard twice, back one time, right, then left. You can now cantankerous and get the key to open the adjacent door. Remember that Skeleton you saw on in an area of the main pit, room? It is time to deal with him now. He shouldn't be that difficult anymore.
Catch the scroll from the main pit room but don't take the teleporter dorsum. We have some other timed sequence to access some other secret. In the corridor leading up to this room, at that place is a minor expanse to the due north which has a button. As i said it is timed, so you lot need to be quick... and I would recommend you to save so you don't have to repeat this area again if you neglect. Press the push button, race to the first of the main pit room. A temporary bridge along the south side. Turn around and confront the wall and strafe to the east and printing the push button on the wall and rapidly strafe back. Now, if yous didn't fall, jump into the pit in the middle where the teleporter was. Good job! You now have the cardinal to the Iron Door!
Open up the cage and loot the surface area and fight off the monsters if you haven't been hither nonetheless, then make your way to the teleporter to the south to go back the the Master Hall. Beware of the grate at the entrance an a Sewer Lurker volition now be at that place. These things are very deadly, and so use a hit an retreat strategy to have it out, or utilise your ranged attacks. You lot can now get all the mode east, then north and open the Atomic number 26 Door. Once looted, we have ane concluding surface area to explore... the Catacomb.
Items Found: Chitin Greaves, Gear Key, Venom Edge
5. Catacomb
If you noticed that this level was very light on the inventory, this surface area will brand up for it as there is lots of items coming. Equally soon as you try to cross the path ahead, the pit volition open up up, as volition doors with skeleton warriors and archers. The goal here is to remove the items off the pressure switches. There is food on a pressure switch westward of the teleporter, and a rock on the north path. Beware, there are lots of Archers around here.
On the far East side, there is a switch, witch will release another political party of skeletons. There is another button on the wall in that cell which has one more skeleton and a underground.
At present return to where we pulled that lever, and become just west to notice another push button on the wall. This volition unleash some other party of skeleton warriors. This button is also timed, so when you printing it, you need to rush downward the north path to the very stop before it closes again. Now you tin can safely render to where we started in the catacomb and cross the pit bridge and collect the last ringlet. At present take that portal back and lets terminate this!
Dorsum in the Main Hall caput to the center. Yous will find iv alcoves with a phrase on the wall near it. Nosotros demand to place the correct gyre in each apse. Save before placing the fourth one!
Put to sleep ... only yet dreaming
Eternally imprisoned ... to depths beyond mensurate
Caverns notwithstanding echoing ... by his telephone call
Crimes forgotten ... just never forgiven
In one case you identify the last roll, put your tail firmly betwixt your legs and run dorsum to the western archway to make your stand up. This is a difficult fight, and getting surrounded is a dandy way to terminate up dead. As well you may need some healing potions to survive this. Scavengers, and lots of them. Take them on 1 or two at a time (depending on how they come up to you) and accept them down. You may also desire to slowly backup if you find you're taking too much impairment, but don't go to far that y'all end up in the open again.
In one case the waves finally subside, head dorsum into the Principal Hall and explore the north and south areas that take but opened. The lever reactivates the teleporters if y'all demand to go dorsum for any reason. Head due east toward the stairs, but become south commencement to visit the Crystal of Life and more items. We can now finally lick our wounds and head downwards to Level five.
Items Found: Battle Axe, Os Amulet, Burrow Rat Shank (iii), Cave Nettle, Crossbow Quarrels (3), Fire Flop, Flarefeather Cap, Frost Bomb, Leather Gloves, Quest Gyre, Rock, Sack, Scroll of Frost Bolt, Tar Bead (iv)
Continue to Level 5
Quick Level Select:
Level 01 Level 02 Level 03 Level 04 Level 05 Level 06 Level 07 Level 08 Level 09 Level 10 Levels 11-13
Other Sections:
Character Guide Potions Secrets Spellcraft Treasures Walkthrough Gallery
lilienthallogetch39.blogspot.com
Source: https://www.crimsontear.com/gaming/legend-of-grimrock/levels/level4
0 Response to "That Level Again 4 Cheat Guide"
Post a Comment